Luddite: Etymology: from Ned Ludd, a member of the organized bands of English handicraftsmen who in 1811, destroyed the textile machinery that was displacing them: one who is opposed to technological change.
Until recently I have been skeptical of the photographic digital technology pixel heads were trying to sell me. I was twelve when I exposed my first black and white film in the early 50's. It was probably on Verichrome Pan or Super XX with a folding Kodak roll-film camera that had belonged to my grandmother. I was fascinated by the mysterious numbers on the mechanism of the camera with its uncoated Bausch and Lomb f/6.3 lens. A few years later, when I graduated from high school, my parents gave me a real camera, a twin-lens Zeiss Ikoflex, and a few years after that a friend at college introduced me to the possibilities of the darkroom where my interest in the technical dimensions of photography grew to include the chemistry and the flexibility of print making. In the late 1950's I bought a fifteen-dollar light meter and a paper-back copy of The Family of Man. The meter and the images in the collection were the Rosetta Stones which connected the technical and physical aspects of photography and its capacity to elicit a viewer's imagination and emotions. It was the beginning of a life-long love of the possibilities of the camera and darkroom which was to become a hobby, and eventually a vocation. Black and white photography has always been a passion.
After graduate school until 1985, I taught American Literature and composition, and at the same time I worked hard to perfect my skill with the camera and in the darkroom. I read and re-read Ansel Adams' series on the Zone System and every pertinent technical text and article I could find including several written by a number of the editors of Photo Techniques. In 1975 I even made a pilgrimage to one of Ansel's Yosemite workshops. Then in 1985 I left teaching. Over the years I exposed and developed thousands of black and white negatives in a variety of formats and constantly upgraded my equipment and worked on my craft and learning to see. I was pleased but seldom satisfied with what I had learned to do with a camera and with my skill in the darkroom.
For most of the last decade I ignored the innovative photographic revolution that had been taking place -- the digital revolution. I resisted putting aside the Nikons, the Hasselblad and the Deardorff. I was not impressed with the quality of what I saw coming out of digital cameras and the files manipulated in PhotoShop. The quality of supposedly serious black and white digital prints was marginal at best. The papers on which they were printed looked cheap, and the inks lacked permanence. Yes, I was a card-carrying Luddite. I never even purchased a zoom lens until 2003.
So what has happened in the last three or four years which caused me to re-examine my Luddite party membership? In the March/April issue of Photo Techniques, in his piece, "A Transition from Darkroom to Digital," Dan Anderson wrote of how his traditional background served him well in making the transition from black and white in the darkroom to black and white with the computer. I have found the same to be true, and like Dan, I am not ready to dump the Nikons and the Hasselblad and the Deardorff. But just an easy transition from film-based to digital photography is not reason enough to join the revolution. For me the reason for joining the revolution is that digital tools have recently improved so much that most of the serious defects in computerized black and white imaging have been over come. The marriage of black and white film and digital technology, and the advance in printers is a good one. Today the permanence of digital papers and inks (reported to be over 200 years in some cases) compares favorably to traditional silver prints. The variety of papers and surfaces now available is more attractive and similar to what was formerly only available in traditional papers. Epson's Presentation Matte, and Premium Luster and Water Color papers are all durable and attractive with surfaces to match a variety of subjects. Today the quality of black and white printers is able faithfully to produce black and white tones matching or even surpassing the color cast, density and tonal scale of some of the best, and now sadly defunct, Kodak, Ilford and Agfa silver papers. With the click of a button my Epson Stylus 3800 can convincingly mimic the warm tones of Ilford's warn tone portrait papers or the selenium toning of Kodak's Poly Max Fine Art or even the sepia tones which used to require a bleaching, rewashing and then and a toning bath and final wash. Yes, the digital tools have changed, and in many instances they have caught up to or even surpassed the tools I used in the darkroom for over four decades.
Besides the aforementioned improvements, the speed, control and ease of manipulation of digital printing has greatly improved. When I was struggling to learn the discipline of traditional film development and enlarging, the learning curve was measured in years. Feed-back from camera to print was extremely slow. It took weeks to calibrate meters and film development. It took at least two hours to develop and dry the film and another couple of hours to expose, develop and wash and dry the print to assess the final image after it dried down. With an accurately calibrated monitor and printer, a digital print now takes just a fraction of that time, and digital camera displays even come with histograms to assist the photographer in instantly assessing an exposure! When I am photographing with my Canon 5D, I leave my ancient Gossen Luna Pro and my beloved Pentax Digital Spot meter at home. In summary because of the vast improvements in digital hard and software in the last few years, I am ready to make some serious concessions to the pixel heads. But wait, don't put out the garage-sale sign yet, and don't rush to Ebay to sell your Deardorff for a dime on the dollar before you read the next few paragraphs. The revolution is not over yet. Digitized photography still has problems left to solve.
The sub-title of this essay is "The re-creation of Black and White Photography," and it is no accident that I have avoided addressing image capture with a digital camera. It is not that I have anything against digital cameras. I have used them with success professionally. I used to have a Canon 20D, and I am presently becoming friends with a Canon 5D, but for the time-being, when it comes to the very best quality black and white prints I can make, I find that the finest quality prints are a result of the marriage of the old and new technologies, and recently I have been gratified by the results I am getting from scanning negatives, some as old as 40 years, and digitally modifying the files to adjust the density, the curves and even the composition and the acuity of the images to re-create pictures the way I felt and thought about them when I first captured them on film. Often the resulting prints are more effective than I had ever been able to achieve in the darkroom with my state-of-the-art enlarger and my hands chapped from the Dektol. The transition from darkroom to digital is not so difficult as one might think. Traditional terminology and the concepts which apply are the same in both cases. If you understand what an H&D curve represents and you are willing to struggle a few days with the miracle of PhotoShop or spend a semester or two in class at a local junior college, you are in for a rewarding surprise. Just don't lose sight of the fact that the digital revolution is just an additional set of tools to help you present what you perceived to someone else.
I hope the following examples will illustrate what I mean about this being a lovely marriage of the old and new technologies. I am going to avoid as much technological name-dropping as possible. The way the revolution has been progressing, by the time you got to the Internet or your photo supply house to purchase new tools, there very well might be better ones available!
Examples and Illustrations:
The negatives in these examples were made using a number of different cameras and formats from 35mm to 5x7. Unless otherwise noted the film was Tri-X rated at between 200 and 400 with an old Gossen Luna-Pro or Zone VI modified Pentax Digital spot meter and developed in D-76 at 68° for times appropriate to the contrast range of the scene. Processing was monitored with a Zone VI temperature compensating timer. Traditional prints were made on a variety of brands of excellent variable contrast papers developed in Dektol and Selectol Soft.
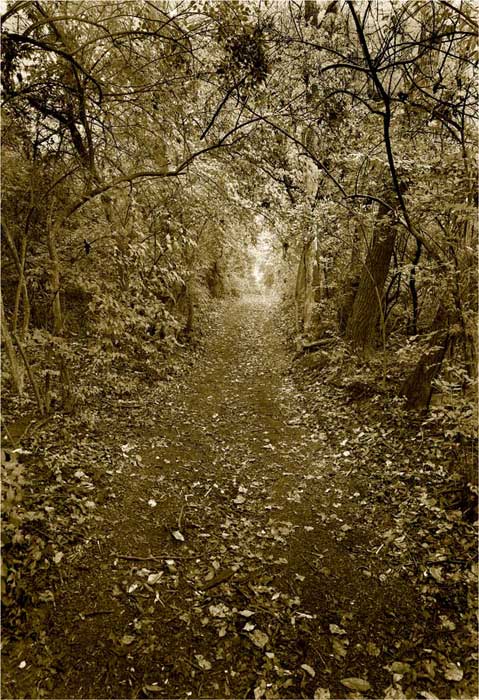
The digital prints shown here were made from negatives scanned with an Epson V700. The files were then manipulated in PhotoShop and printed using Qimage software with an Epson Stylus Pro 3800 printer on Epson Premium Luster paper which I felt would reproduce best in Photo Techniques. Because many of the subtle difference in the details of the prints could not be reproduced by the photogravure process in the magazine I chose to show only the comparative example of the Woodland Path because it demonstrated the possibilities and variety of digital tools available.
Click on picture
for larger image
Example 1:
Woodland Path, 2006, St., Louis, Fall, 2006, Deardorff 4x5, 90mm Rodenstock Grandagon, 1/8th @ f/22, 4x5 Tri-X Dev. D-76 1:1, 10¼ min.
The black and white image was first manipulated by turning it into a duotone and then into a color file to maintain the warmth which "felt" appropriate for the final print. I then "stretched" the proportions of the composition in PhotoShop by increasing the vertical dimension of the image while holding the width constant, something impossible to do in the conventional darkroom without losing part of the composition. This added to the magnetism of the light up the hill.
Example 2:
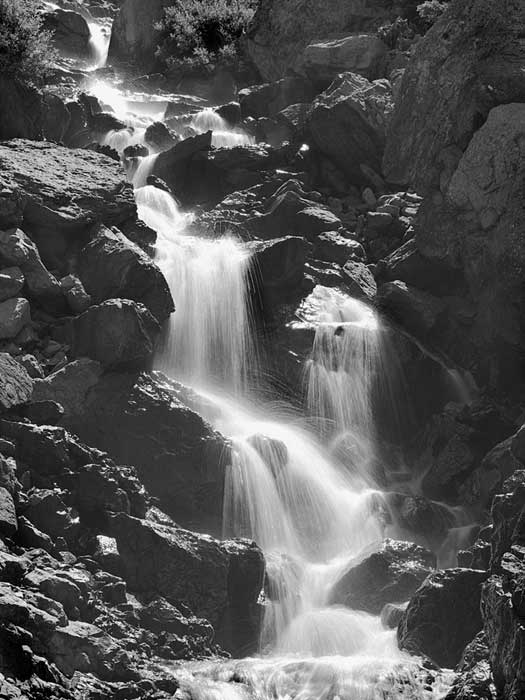
Cascade, 1978, Telluride, Colorado, Kardan Color 4x5 camera with 180mm Schneider f/5.6 Symmar, 1/15 at f/22 (estimate); Tri-X at 320, Developed in D:76, 7 min.
The extreme contrast at 9000 feet and serious miscalculations in exposure and development made it almost impossible to print this negative with traditional techniques. It was underexposed and over-developed. The shadow detail was a whisper and the highlights in the cascade were blown out because of the overdevelopment. This example was made from a scan of the negative which was then manipulated, or more appropriately salvaged, in PhotoShop to preserve the "sparks" of the water while still maintaining some of the delicate detail in the dark gray rocks. There is a lesson here: negatives which are overexposed and underdeveloped work best both in the darkroom and in the computer. It's always easier to add contrast than trying to subtract it.

Example 3:
A. Mule in Rain, 1970, Lake City, South Carolina, Nikon FTN with 50mm f/1.4 lens, 1/30 @ f/8, Tri-X rated at 200, D-76 1:1, 7¼ minutes.
It had been a hot and humid summer, and it had not rained for a couple of weeks. I came across this venerable creature just as the rain began. I made this with a 50mm f/1.4 lens on an old Nikon resting the camera on the rolled-down window of the car. The negative was weak, but luckily the highlights had not been blown out with over development. Grain was minimal because of less-than-normal development. I was able to make a nice silver print on Ilford polycontrast paper with a #3 or 3½ filter developed in Selectol Soft and Dektol and an Omega condenser enlarger. When digitally printed adding just an appropriate hint of warmth to the image was a simple option with the Epson printer. I have always been drawn to the texture of the scene and being able to see the streaks of rain and the detail of the mule as he stands and waits cooling off in the rain. When optically printed, you can see the streaks of rain. In this digitally scanned example the detail is so crisp, you can hear and smell it too.
Example 4:
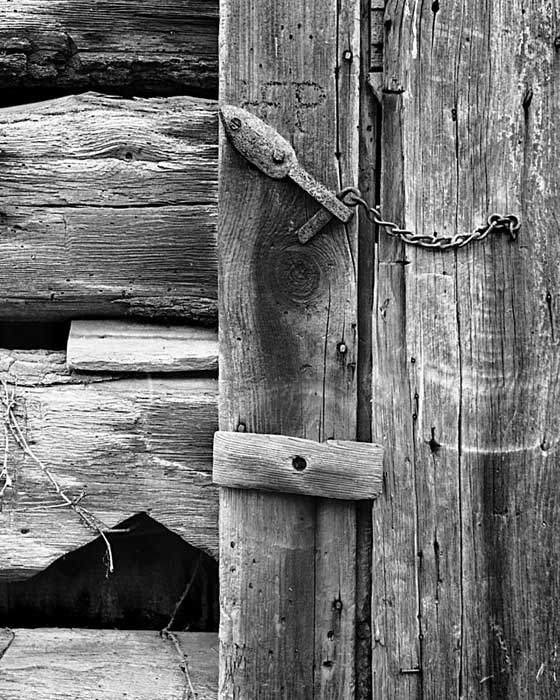
Menefee's Barn Detail, 1972, St. Louis, Missouri, Zeiss Ikoflex, Verichrome Pan, D-76, aperture and shutter speed and processing details not recorded.
I found the detail of the way the logs had been notched together and the originality of the ingenious latch which had worn the semi-circular pattern on the door reminiscent of someone who had passed this way years before I arrived with my camera. I have always liked what the picture did for my imagination. The digital rendition revealed subtle details and a tonal quality never possible with the enlarger.
Example 5:
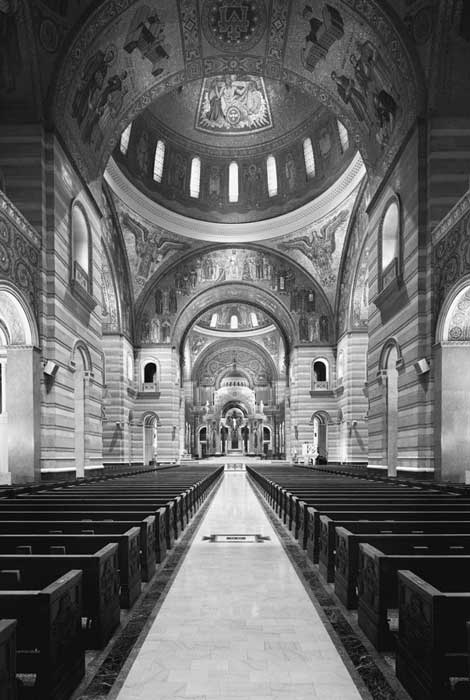
The St. Louis Basilica, 2004, St. Louis, Missouri, Deardorff 5x7, Rodenstock 90mm f/4.5 Grandagon, 6 minutes @ f/22½, Tri-X, D-76 1:1, 9 minutes.
The church was much darker and lower in contrast than the example suggests. The long exposure to maintain depth of field and capture detail in the shadows and the subsequent reciprocity departure increased strength of the contrast to reveal the spectacular detail throughout the church. The scan required almost no manipulation to turn it into the final file and print.
If you plan to use the technique of scanning your vintage black and white negatives or new ones, this former Doubting Thomas has found the most effective negatives are comparatively flat with plenty of shadow and highlight detail, the kind of negative that might print best conventionally with a 3 or 3½ filter.
In the opinion of this former Luddite, the marriage of black and white film and digital technology is a good one which promises to get even better with age.