Zone plates are becoming increasingly useful as a way of focusing X-rays. They are used in X-ray telescopes in astronomy and X-ray lithography in experimental printed circuit fabrication. Basically the zone plate is a way of doing non-lens photography similar to the pinhole but that allows more light to get to the film. This makes the "effective" f# lower allowing for shorter exposures. Practically this means almost 3 stops or 1/8 the exposure time. Not bad, this would bring F2048 to F256, a vast improvement. This is one of the least understood areas of non-lens photography. It took me quite some time to find the proper equations and information. Most pinhole books and literature mention them, but don't give enough information for the lay person to make their own. Well no more, the secret is about to be revealed! Do not be put off by the math, as I give real answers and practical ways of doing later on. MATH: diameter of zone = 2 X squareroot(focal length X zone index X wavelength) Ouch! Let's try a table: (green light, zone plates are wavelength sensitive just like the pinhole)
ACTUAL SIZE DIAMETER OF ALTERNATING B&W RINGS OF ZONE PLATE, mm
| ZONE INDEX |
Focal Length in mm | |||||||
|---|---|---|---|---|---|---|---|---|
| 25 | 50 | 75 | 100 | 125 | 150 | 175 | 200 | |
| 1 | 0.23 | 0.33 | 0.41 | 0.47 | 0.52 | 0.57 | 0.62 | 0.66 |
| 2 | 0.33 | 0.47 | 0.57 | 0.66 | 0.74 | 0.81 | 0.88 | 0.94 |
| 3 | 0.41 | 0.57 | 0.70 | 0.81 | 0.91 | 0.99 | 1.07 | 1.15 |
| 4 | 0.47 | 0.66 | 0.81 | 0.94 | 1.05 | 1.15 | 1.24 | 1.33 |
| 5 | 0.52 | 0.74 | 0.91 | 1.05 | 1.17 | 1.28 | 1.39 | 1.48 |
| 6 | 0.57 | 0.81 | 0.99 | 1.15 | 1.28 | 1.41 | 1.52 | 1.62 |
| 7 | 0.62 | 0.88 | 1.07 | 1.24 | 1.39 | 1.52 | 1.64 | 1.75 |
| 8 | 0.66 | 0.94 | 1.15 | 1.33 | 1.48 | 1.62 | 1.75 | 1.88 |
| 9 | 0.70 | 0.99 | 1.22 | 1.41 | 1.57 | 1.72 | 1.86 | 1.99 |
| 10 | 0.74 | 1.05 | 1.28 | 1.48 | 1.66 | 1.82 | 1.96 | 2.10 |
| 11 | 0.78 | 1.10 | 1.35 | 1.56 | 1.74 | 1.91 | 2.06 | 2.20 |
Results are the diameter of the zones in mm, hmm.... pretty small!
OK, so how do we deal with this, use a microscope to draw the image? Nope! There is an easier way through "lens" photography. No one said that we could not use a lens to make the non-lens.
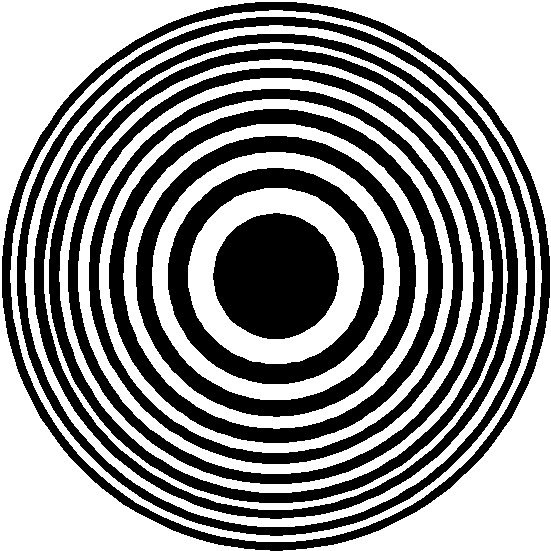
DEFINITION: ZONES - these are alternating areas of clear (or white) and opaque (or black).
By using a drawing program such as Corel Draw on the PC, we can draw out the Zone Plate at say 100X normal size quite easily.
100X ZONEPLATE FOR 50mm "LENS"
NOTE: Image should be 145mm across printed full scale! (Printing from the web often makes things smaller)
We then photograph these drawings from the correct distance with the appropriate high resolution lenses and film, develop and mount the resulting image on our zone plate camera.
Hmm, how far away did you say? OK, here comes another equation & table:
DISTANCE FROM ZONEPLATE IMAGE FOR 35mm CAMERA
| Distance in mm | Distance in feet | |||
|---|---|---|---|---|
| Lens, mm | 100X image | 50X image | 100X image | 50X image |
| 35 | 3535 | 1785 | 11.6 | 5.8 |
| 40 | 4040 | 2040 | 13.3 | 6.6 |
| 45 | 4545 | 2295 | 14.9 | 7.5 |
| 50 | 5050 | 2550 | 16.6 | 8.3 |
| 55 | 5555 | 2805 | 18.2 | 9.1 |
| 60 | 6060 | 3060 | 19.9 | 9.9 |
| 65 | 6565 | 3315 | 21.5 | 10.8 |
| 70 | 7070 | 3570 | 23.2 | 11.6 |
| 75 | 7575 | 3825 | 24.8 | 12.4 |
| 80 | 8080 | 4080 | 26.5 | 13.3 |
| 85 | 8585 | 4335 | 28.2 | 14.1 |
Distance = Magnification X (F + F/Magnification)
where Magnification is greater than one
F is the focal length of the lens used to do the copy work (for instance a 50mm lens on your 35 mm camera)
Well, this all fine a good for a ZONEPLATE of 50mm focal length, but what about other focal lengths?
We simply modify the distance by a "factor" for each different focal length we wish. Another Table!
HOW TO MODIFY CAMERA DISTANCE FOR OTHER ZONEPLATE FOCAL LENGTHS
Distance in feet from a 100X 50mm Zoneplate image for desired zoneplate focal length (top row) with chosen 35mm lens (far left column).
| 25 | 50 | 75 | 100 | 125 | 150 | 175 | 200 | 250 | 300 | 350 | 400 | 450 | 500 | |
| 35 | 16.4 | 11.6 | 9.5 | 8.2 | 7.3 | 6.7 | 6.2 | 5.8 | 5.2 | 4.7 | 4.4 | 4.1 | 3.9 | 3.7 |
| 40 | 18.8 | 13.3 | 10.9 | 9.4 | 8.4 | 7.7 | 7.1 | 6.7 | 5.9 | 5.4 | 5.0 | 4.7 | 4.4 | 4.2 |
| 45 | 21.1 | 14.9 | 12.2 | 10.5 | 9.4 | 8.6 | 8.0 | 7.5 | 6.7 | 6.1 | 5.6 | 5.3 | 5.0 | 4.7 |
| 50 | 23.5 | 16.6 | 13.6 | 11.7 | 10.5 | 9.6 | 8.9 | 8.3 | 7.4 | 6.8 | 6.3 | 5.9 | 5.5 | 5.2 |
| 55 | 25.7 | 18.2 | 14.9 | 12.9 | 11.5 | 10.5 | 9.7 | 9.1 | 8.1 | 7.4 | 6.9 | 6.4 | 6.1 | 5.8 |
| 60 | 28.1 | 19.9 | 16.2 | 14.1 | 12.6 | 11.5 | 10.6 | 10.0 | 8.9 | 8.1 | 7.5 | 7.0 | 6.6 | 6.3 |
| 65 | 30.4 | 21.5 | 17.6 | 15.2 | 13.6 | 12.4 | 11.5 | 10.8 | 9.6 | 8.8 | 8.1 | 7.6 | 7.2 | 6.8 |
| 70 | 32.8 | 23.2 | 18.9 | 16.4 | 14.7 | 13.4 | 12.4 | 11.6 | 10.4 | 9.5 | 8.8 | 8.2 | 7.7 | 7.3 |
| 75 | 35.2 | 24.9 | 20.3 | 17.6 | 15.7 | 14.4 | 13.3 | 12.5 | 11.1 | 10.2 | 9.4 | 8.8 | 8.3 | 7.9 |
| 80 | 37.5 | 26.5 | 21.6 | 18.7 | 16.8 | 15.3 | 14.2 | 13.3 | 11.9 | 10.8 | 10.0 | 9.4 | 8.8 | 8.4 |
| 85 | 39.9 | 28.2 | 23.0 | 19.9 | 17.8 | 16.3 | 15.1 | 14.1 | 12.6 | 11.5 | 10.7 | 10.0 | 9.4 | 8.9 |
PHOTOGRAPHING THE ZONE PLATE IMAGES
- Print the zone plate from this site. (or better yet, draw your own from the equations for better quality)
- Paste to a larger sheet of white mount board.
- Set against or attach to a wall that is evenly lit.
- Measure off the required distance from zone plate to camera.
- Camera lens should be at exactly the same height as the center of the zone plate image.
- You should be directly in front of the zone plate image, being to one side or the other will distort the image.
- Take a series of exposures. bracket exposures +/- 2 stops in at least 1/2 stop intervals. (first time only, after you determine correct exposure you will not need to do this every time)
- Process film for high contrast (see below)
- With high powered loupe, assess images and pick out the cleanest ones.
- Cut out resulting image and mount to a brass shim with appropriate sized hole to allow the zone plate to be visible. Mount to camera.
FILM & DEVELOPING
I recommend Kodak Technical Pan film TP-135-36, an extremely high resolution, high contrast film. It is best to bracket exposures. The film is VERY sensitive to exposure changes. In full sunlight the exposure will be around 1/1000 second at F5.6 / F8 (ASA 200). NOTE: F16 is usually not the best aperture to use. F8 tends to be sharper on most normal 35mm camera lenses.
Develop in paper strength Dektol for 3 minutes at 68° F. You can probably substitute your own favorite paper developer.
